LONDON: The Game DVR makes it easy to share game clips with your Xbox-using friends.
There are plenty of ways for PC gamers to share gameplay videos, what with YouTube and livestreaming services like Twitch. But before you can share a video, you have to capture it first.


With Windows 10’s Game DVR feature, you can easily record your gaming exploits and share with your Xbox-using friends—all without downloading and installing additional software like Nvidia’s ShadowPlay or OBS. Here’s how to get started.
If you haven’t used the Xbox app before or don’t own an Xbox console, you’ll need to first set up a gamertag—basically, your Xbox screen name. Pop open the Xbox app and follow the onscreen instructions, and the Xbox app will take care of the rest. (The Xbox app doesn’t need to be open in order for the Game DVR feature to work, but you’ll want to get set up with an Xbox account before you dive in.
Next, open the game you want to play: For the sake of this article, we’re going to play Crossy Road because I’ve got Frogger on the brain. Once you’re ready to begin recording, press the keyboard shortcut Windows key + G. A set of controls will appear on top of your game window: Press the Record button (the red circle) or type Win + Alt +R to begin recording. Once you’re done, hit Win + Alt + R again to stop recording.
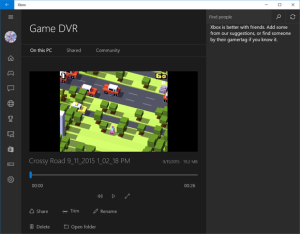
To view your recorded clips, open the Xbox app if it isn’t already and click the Game DVR button located in the left sidebar—look for an icon of a game controller with a film reel. Click the video you want to watch, then press the play button and relive your moment of triumph (or defeat). You’ll notice that the GameDVR captures only the game window, and it also captures the game audio.